Sunday 22 November 2020

Why my auto_increment_increment is 3 in percona galera cluster (PXC)

 People often have a doubt when they move from native MySQL replication to PXC / clusters.


Why is my auto_increment_increment value  3?


People usually realize this question when their primary key (auto_increment) has reached its limit and gives an error.


The above scenario will arise due to poor design of their databases. People often use smallint / mediumint for their auto_inc primary key. Before migrating to PXC their database might be in M-S / M-M cluster setup. Most of the configuration for M-M setup won’t be an actual M-M setup. It will be used as an active-passive where people often forget to declare the auto_increment_increment & auto_increment_offset values properly.


For an M-S


We can have, 

auto_increment_increment = 1

auto_increment_offset = 1


For an M-M


We should have,  On both servers as follows

Server 1

auto_increment_increment = 1

auto_increment_offset = 1


Server 2

auto_increment_increment = 2

auto_increment_offset = 2


The difference between these variables are 


auto_increment_offset : determines the starting point for the AUTO_INCREMENT column value

auto_increment_increment : controls the interval between successive column values
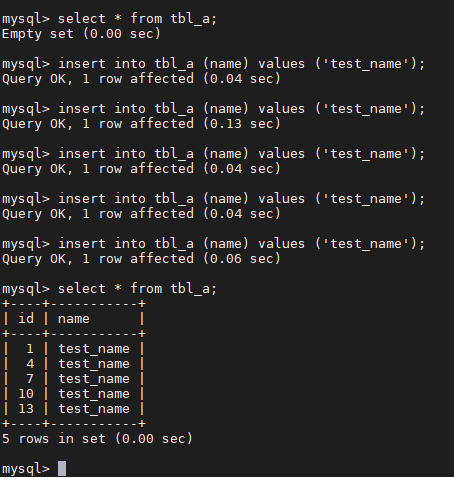

For eg,

If you have the variables declared as below 


auto_increment_offset = 1

auto_increment_increment = 3


And your table structure is,


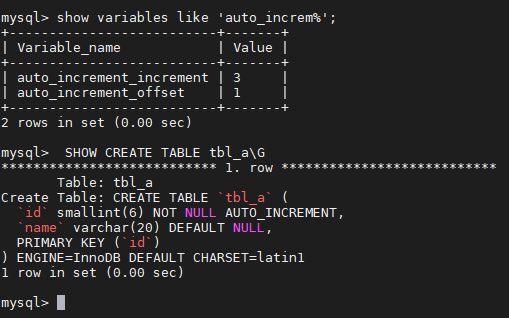
When you insert a record to the table the first id will store as 1 and for the second insert it will store as 4 and third entry as 7 and fourth entry as 10 and so on .


The series will be 1,4,7,10,13,16,........


Hope we are good with ideas between these variables.


Now coming to the actual point, Why my auto_increment_increment is 3 in Percona Galera Cluster (PXC).


PXC has the inbuilt algorithm which is handled by variable wsrep_auto_increment_control  to control the auto_increment_increment  value whenever a new node is joined to the cluster it will change the value of the variable accordingly.


This can be seen here,


We have a three-node galera cluster setup ready, once the first node is bootstrapped, you can see the cluster size and auto-increment values assigned


Now after starting the second node


Finally starting the third node,


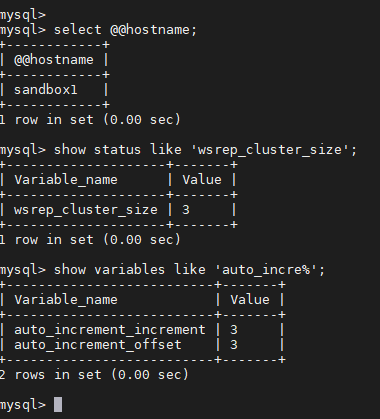
Similarly, if a node is removed from the cluster the variable will be adjusted automatically.


When you have a three-node cluster your variable values will be declared as below (the offset value can change depending on which node was started first/last),


Node 1:

auto_increment_offset = 1

auto_increment_increment = 3


Node 2:

auto_increment_offset = 2

auto_increment_increment = 3


Node 3:

auto_increment_offset = 3

auto_increment_increment = 3


This is because to avoid duplicate entries inside the cluster. In the above scenario, each node will insert records in the series


Node 1 : 1,4,7,10,13,.....


Node 2 : 2,5,8,11,14,.....


Node 3 : 3,6,9,12,15,....


In this method, you won’t face duplicate entries inside your cluster. This is the reason why a three-node PXC auto_increment_increment  has value 3. You can’t control this variable value manually, even if you change it will revert back to the actual value.


Thursday 9 April 2020

Setting up streaming replication in 9.5

Streaming Replication (SR) provides the capability to continuously ship and apply the WAL XLOG records to x number of standby servers in order to keep them in sync with primary node.


This blog will help you to easily setup a streaming replication for postgresql version 9.5


Primary : Represents primary db which will be our active node which can accept writes


Standby : Represents secondary db which will be our replica node which can accept only reads


Step 1: Create a replication user


Create a User for replication in the Primary. Don’t use superuser postgres in order to setup replication.


postgres=# CREATE USER replica WITH REPLICATION ENCRYPTED PASSWORD 'secret';

CREATE ROLE


Step 2: Add replication user entry on pg_hba.conf file


Allow replication connections from Standby to Primary by adding a similar line to the pg_hba.conf file of the Primary. 


host replication replica 192.168.1.20/32 md5  


To get the changes into effect execute below query on postgresql db on Primary.


 select pg_reload_conf();


Step 3: Clean data dir of Standby


Before proceeding further step make sure your Standby data dir is empty , you can take a backup of data dir and empty the contents of data dir


mkdir  /usr/local/pgsql/data_backup

mv /usr/local/pgsql/data/*  /usr/local/pgsql/data_backup/


rm -rf /usr/local/pgsql/data/*


Step 4: Take a backup of Primary from standby (Receiver)


Use pg_basebackup  to backup the data directory of the Primary from the Standby. While creating the backup, you can also tell pg_basebackup  to create the replication specific files and entries in the data directory using "-R" (this will create the relevant recovery.conf file on Standby).


pg_basebackup -h 192.168.1.20 -U replica -p 5432 -D /usr/local/pgsql/data/ -P -Xs -R


Example O/p 


pg_basebackup -h 192.168.1.19 -U replica -p 5432 -D /usr/local/pgsql/data -P -Xs -R

Password:

29857/29857 kB (100%), 1/1 tablespace


Step 5: Edit the postgresql.conf file on Standby


Edit the postgresql config file as it contains the same data as in Primary. We need to change some parameters on the standby node (ie Receiver). Below variables has to be considered


listen_addresses = 192.168.1.20   ## set your local ip of the server

#hot_standby = on             # comment this to make it for read only


Step 6: Start Postgresql on Standby


Start the postgresql service on standby db and check the status


/usr/local/pgsql/bin/pg_ctl start -l logfile -D /usr/local/pgsql/data


/usr/local/pgsql/bin/pg_ctl status -l logfile -D /usr/local/pgsql/data


Step 7: Testing replication


Below commands will verify the wal status


On Primary 


select pg_current_xlog_location();   ===> to see current wal lsn on Primary

select * from pg_stat_replication;  ===> to see repl status on Primary


On Receiver

select pg_last_xlog_receive_location(); ===> to see last received wal on Receiver

select pg_last_xlog_replay_location();  ===> to see last wal applied  on Receiver


If you try to create a db/table on standby you will get below error.


postgres=# create database test1;

ERROR:  cannot execute CREATE DATABASE in a read-only transaction

postgres=#


Thursday 20 February 2020

Source installation postgresql 9.5

In this blog we will see how to install postgresql 9.5 source installation.

We will get rpm files for the latest 9.5 version ,

if we need the older version the best way is to source or binary installation. 


Step 1: Download postgreSQL source code


From the postgreSQL download site, choose the version


wget https://ftp.postgresql.org/pub/source/v9.5.9/postgresql-9.5.9.tar.gz


Step 2: Install postgreSQL


tar -zxvf postgresql-9.5.9.tar.gz 

cp -r postgresql-9.5.9 /opt/

cd /opt/postgresql-9.5.9

./configure

 make

make install


PostgreSQL Installation Issue1:


You may encounter the following error message while performing ./configure during postgreSQL installation.


# ./configure

checking for -lreadline... no

checking for -ledit... no

configure: error: readline library not found

If you have readline already installed, see config.log for details on the

failure.  It is possible the compiler isn't looking in the proper directory.

Use --without-readline to disable readline support.

PostgreSQL Installation Solution1:


Install the readline-devel and libtermcap-devel to solve the above issue


yum install libtermcap-devel 

yum install readline-devel


Other error fix


yum groupinstall "Development Tools"

./configure   --without-zlib


Step 3: Verify the postgreSQL directory structure


After the installation, make sure bin, doc, include, lib, man and share directories are created under the default /usr/local/pgsql directory as shown below.


# ls -l /usr/local/pgsql/


[root@db2 postgresql-9.5.9]# ls -l /usr/local/pgsql/

total 16

drwxr-xr-x 2 root root 4096 May 13 15:08 bin

drwxr-xr-x 6 root root 4096 May 13 15:08 include

drwxr-xr-x 4 root root 4096 May 13 15:08 lib

drwxr-xr-x 6 root root 4096 May 13 15:08 share

[root@db2 postgresql-9.5.9]#


Step 4: Create postgreSQL user account


# adduser postgres


# passwd postgres

Changing password for user postgres.

New UNIX password:

Retype new UNIX password:

passwd: all authentication tokens updated successfully.


Step 5: Create postgreSQL data directory


Create the postgres data directory and make postgres user as the owner.


mkdir /usr/local/pgsql/data

chown postgres:postgres /usr/local/pgsql/data

ls -ld /usr/local/pgsql/data


Step 6: Initialize postgreSQL data directory


Before you can start creating any postgreSQL database, the empty data directory created in the above step should be initialized using the initdb command as shown below.


su - postgres

/usr/local/pgsql/bin/initdb -D /usr/local/pgsql/data/


May face below error 

initdb: invalid locale settings; check LANG and LC_* environment variables


Fix will be 

export LC_ALL="en_US.UTF-8"

Step 7: Validate the postgreSQL data directory


Make sure all postgres DB configuration files (For example, postgresql.conf) are created under the data directory as shown below.


$ ls -l /usr/local/pgsql/data

bash-4.2$ ls -l /usr/local/pgsql/data

total 48

drwx------ 5 postgres postgres    41 May 13 15:17 base

drwx------ 2 postgres postgres  4096 May 13 15:17 global

drwx------ 2 postgres postgres    18 May 13 15:17 pg_clog

drwx------ 2 postgres postgres     6 May 13 15:17 pg_commit_ts

drwx------ 2 postgres postgres     6 May 13 15:17 pg_dynshmem

-rw------- 1 postgres postgres  4468 May 13 15:17 pg_hba.conf

-rw------- 1 postgres postgres  1636 May 13 15:17 pg_ident.conf

drwx------ 4 postgres postgres    39 May 13 15:17 pg_logical

drwx------ 4 postgres postgres    36 May 13 15:17 pg_multixact

drwx------ 2 postgres postgres    18 May 13 15:17 pg_notify

drwx------ 2 postgres postgres     6 May 13 15:17 pg_replslot

drwx------ 2 postgres postgres     6 May 13 15:17 pg_serial

drwx------ 2 postgres postgres     6 May 13 15:17 pg_snapshots

drwx------ 2 postgres postgres     6 May 13 15:17 pg_stat

drwx------ 2 postgres postgres     6 May 13 15:17 pg_stat_tmp

drwx------ 2 postgres postgres    18 May 13 15:17 pg_subtrans

drwx------ 2 postgres postgres     6 May 13 15:17 pg_tblspc

drwx------ 2 postgres postgres     6 May 13 15:17 pg_twophase

-rw------- 1 postgres postgres     4 May 13 15:17 PG_VERSION

drwx------ 3 postgres postgres    60 May 13 15:17 pg_xlog

-rw------- 1 postgres postgres    88 May 13 15:17 postgresql.auto.conf

-rw------- 1 postgres postgres 21332 May 13 15:17 postgresql.conf

Step 8: Start postgreSQL database


Use the postgres postmaster command to start the postgreSQL server in the background as shown below.


/usr/local/pgsql/bin/pg_ctl -D /usr/local/pgsql/data/ -l logfile start

$ cat logfile


bash-4.2$ cat  logfile

LOG:  database system was shut down at 2020-05-13 15:17:46 IST

LOG:  MultiXact member wraparound protections are now enabled

LOG:  database system is ready to accept connections

LOG:  autovacuum launcher started


Step 9: Login and create postgreSQL DB and test the installation 


bash-4.2$ /usr/local/pgsql/bin/psql

psql (9.5.9)

Type "help" for help.


postgres=# \l

                                  List of databases

   Name    |  Owner   | Encoding |   Collate   |    Ctype    |   Access privileges

-----------+----------+----------+-------------+-------------+-----------------------

 postgres  | postgres | UTF8     | en_US.UTF-8 | en_US.UTF-8 |

 template0 | postgres | UTF8     | en_US.UTF-8 | en_US.UTF-8 | =c/postgres          +

           |          |          |             |             | postgres=CTc/postgres

 template1 | postgres | UTF8     | en_US.UTF-8 | en_US.UTF-8 | =c/postgres          +

           |          |          |             |             | postgres=CTc/postgres

(3 rows)


postgres=# create database test;

CREATE DATABASE

postgres=# \l

                                  List of databases

   Name    |  Owner   | Encoding |   Collate   |    Ctype    |   Access privileges

-----------+----------+----------+-------------+-------------+-----------------------

 postgres  | postgres | UTF8     | en_US.UTF-8 | en_US.UTF-8 |

 template0 | postgres | UTF8     | en_US.UTF-8 | en_US.UTF-8 | =c/postgres          +

           |          |          |             |             | postgres=CTc/postgres

 template1 | postgres | UTF8     | en_US.UTF-8 | en_US.UTF-8 | =c/postgres          +

           |          |          |             |             | postgres=CTc/postgres

 test      | postgres | UTF8     | en_US.UTF-8 | en_US.UTF-8 |

(4 rows)


postgres=#